Push/Fold Standards
In the previous page, we listed the factors you should use in push/fold judgment.
Now let us work through actual examples and decide whether to push or fold.
Example 1
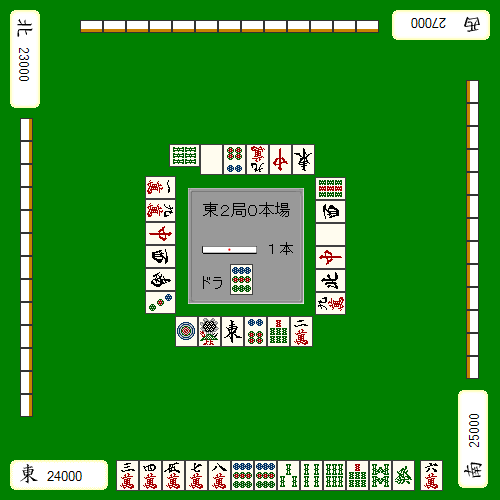
This is the kind of hand that makes you want to shout "riichi" the moment you see it, but let us start with an extreme case like this.
[Ease of winning] It is a good-shape ryanmen tenpai.
[Point value] If you riichi, the hand is worth 11600, which is more than enough.
[Tile danger] ![]() is not a particularly dangerous tile.
is not a particularly dangerous tile.
[Chance that folding succeeds] Your only safe tile is ![]() .
.
No matter which factor you look at, there is no reason not to push.
This is an unquestionable chase-riichi.
Example 2
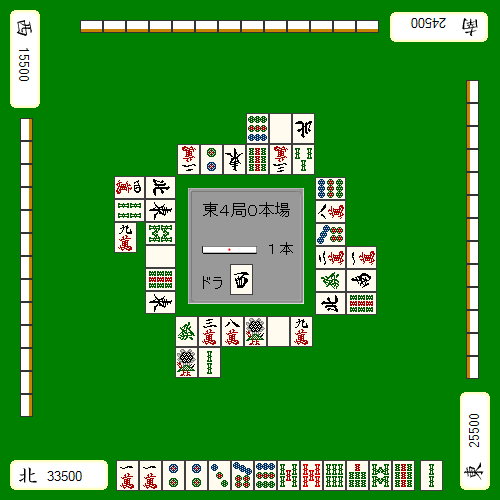
Next is a case where you should obviously fold.
[Ease of winning] The hand is two-shanten, still leaves a bad shape, cannot call well, and the chance of finishing from here is very low.
[Point value] Riichi, dora 1, and maybe pinfu if things go well. The value is mediocre.
[Tile danger] The least useful tile is ![]() , but it is still fairly dangerous.
, but it is still fairly dangerous.
[Chance that folding succeeds] You already have two genbutsu, ![]()
![]() , and
, and ![]() is also reasonably safe, so you can fold comfortably.
is also reasonably safe, so you can fold comfortably.
You are also in first place while the riichi player is in last place.
With all of that in place, there is no need to cling on.
If you fold here, the correct sequence is to start with 8s, then keep the common safe tile 9s for later.
Of course, real games are rarely this clear-cut.
More often, you will see both reasons to push and reasons to fold at the same time.
Example 3
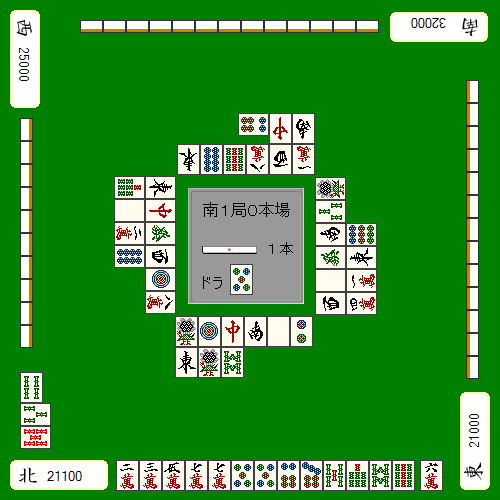
[Ease of winning] One-shanten, but the acceptance is not especially large.
[Point value] Menzen pinfu with dora 1 to dora 3 gives enough value.
[Tile danger] There are still many live suji, but both ![]() and
and ![]() are dangerous.
are dangerous.
[Chance that folding succeeds] You have two genbutsu and one suji tile, so there is a real chance of folding out successfully.
On top of that, this is South round and the player in first place has declared riichi, which naturally makes you want to fight for the top.
If you want to reduce hesitation in spots like this and make your push/fold judgment more stable, you need one main pillar to rely on.
This site recommends using your own shanten count as that baseline.
In concrete terms, the basic rule is:
if you are going to push into riichi, you should at least be in tenpai.
An easy way to remember it is:
- If you are in tenpai, you push.
- If you are one-shanten, you may push at most one dangerous tile.
- If you are two-shanten or worse, the default is full folding.
Why should you not keep fighting from one-shanten or worse?
Because until you reach tenpai, you have no opportunity to score at all.
Even if you keep pushing, there is no guarantee that you will tenpai next turn.
You may simply draw more dangerous tiles first.
Cutting dangerous tiles before you are in tenpai often does nothing except give the riichi player more chances to win.
Even a high-value one-shanten only becomes meaningful once you actually reach tenpai.
So in Example 3, pushing two dangerous tiles from this level of one-shanten acceptance is unfavorable.
Folding is better.
Theory Summary
The mainstream approach is to base push/fold judgment on shanten count.
Push when in tenpai, fight at most one tile from one-shanten, and full-fold from two-shanten or worse.
Push/fold judgment is extremely hard to reduce to fixed patterns.
So from here on, instead of forcing a rigid classification, we will look at practical examples from red-five mahjong and decide whether to push or fold.
Original Japanese page: http://beginners.biz/osihiki/osihiki03.html